 |  |  |  |  |  |  |  |
 |  |  |  | INBMA |  |  |  |
Brad Sondahl's Garden Cart
| | | | | | | |
| | | | INBMA | | | |
The difference between a garden cart and a wheelbarrow
is huge. A wheelbarrow can haul stuff down a narrow trail, while
you keep it stabilized with the two handles. When you set it down
you have to be careful not to tip it over. A garden cart, with its
two wheels, can't negotiate such narrow places as a wheelbarrow, but most
yards don't need to. By keeping the center of gravity over the wheels,
over a hundred pounds can be easily transported, and lighter loads can
be pushed with only one of the handles. A garden cart can hold more
than a wheelbarrow as well.

So here's my original garden cart. I make a point of building
stuff out of scrounged materials, so, as Picasso is rumored to have said,
to make something first is to make something ugly. If you build it
out of nice new materials, it will look nice and new. I've left it
out in the elements for years.
What you see is a wooden box, with the front end missing.
I've added a piece of wood at an angle inside near the front, to help hold
more material in. You could actually remove the rest of the box below
this point, but sometimes when I'm working in the garden I'll use this
place to set rocks on (as long as I remember to get them out before dumping...)
This particular box was built of one inch wood. Strips were added at the
front and in the corners to help hold it together. It's mostly fastened
with gold deck screws. I think a box built of 1/2 inch exterior plywood
would hold up well, except plywood is bendable so might need some wood
strips to stiffen it at the edges, which also prevent splintering.. At
the least the exposed edges of the plywood (particularly in the dumping
area at the front) should have added wood strips, including sanding
off the sharp edges, and applying linseed oil or paint.
I've also used a couple of old bicycle wheels (26 inch,
but smaller would work pretty well). When you remove the wheels from
the defunct bicycle, keep the nuts and washers. On the box itself,
you just need to make a hole into the box so the wheel sticks down below
it 8-10 inches, slightly in front of the center of gravity of the side
of the box. You can attach the wheel through this hole with the washer
and nut. The plywood piece that looks like home plate is there to
support the outside of each wheel. It could have been square,
or even a circle, but it cut fast with a skilsaw in that shape.
The reason for that shape, though, is critical to the
concept of this garden cart. You should know from mathematics that
3 points defines a plane. In order to hold the wheel securely, the
plywood represents a plane through which the outer bolt for the wheel can
be attached, defining one point. The other two points are defined
by some pieces of wood attached onto the box, the same thickness (roughly)
as the wheel. In this case, it happened that short sections of two
by four (using the 3 1/2 inch side) were the same thickness as the wheel.
So I cut short pieces of two by four (knots may actually be good in the
sections, as they help prevent splitting).
Predrilling the holes (also to prevent splitting), I
used some 3 inch deck screws to secure the plywood to the 2 X 4 sections,
and the 2 X 4's to the box. Before securing the plywood tight, you
have to allign the wheel so it won't rub, and mark where to make the hole
for the wheel bolt. This is easy--when it's lined up, give it a whack
with a hammer on top of the plywood over the bolt, and the mark on the
other side of the plywood will show you where to drill.

Next come the handles. Originally they were just
two old tool handles ( I used to break a lot of shovels). Thick broom
handles might work too, but hardwood is preferred, as you can be lifting
a fair amount of weight... I've also made one using knotless 2 X
2's, and that works, but isn't as nice as round wood. Perhaps you
can get 1 " or greater dowels as another alternative... Make them
long enough so when you lift the cart you can walk with it out of your
foot tread area. (It looks about 2 feet to me. If you're interested
I can measure them for you). The longer handles also increase your leverage
in lifting the cart.
The problem in mounting round dowels to a flat surface
is that they will tend to bend from only having a tangential attachment.
Also note that this is one case where you may wish to align the grain of
the wood vertically on the handle, since most of the stress will come from
lifting up and down. So if possible mark a line the distance in on the
dowel where you'll attach it, cut in a bit with a coping or other fine
bladed saw, and cut or chisel a section flat where the handle will attach.
Make sure to predrill your holes through the dowel, to prevent splitting.
I think for this I again used deck screws (4 of them), but probably nuts
and bolts are a better bet at not loosening under stress. You can
also note how I added strips of wood above and below to secure the handles,
as well.

The final step is to add some two by two (or 2 X 4) posts at the back, either behind the wheels, or if there isn't room there, under the handles of the cart.
Good luck if you want to build one!
Update 2010:
A friend gave us a weathered bicycle trailer designed to haul kids. With a sheet of half inch exterior plywood and some nuts and bolts and strips of wood, I've made a slightly nicer garden cart:
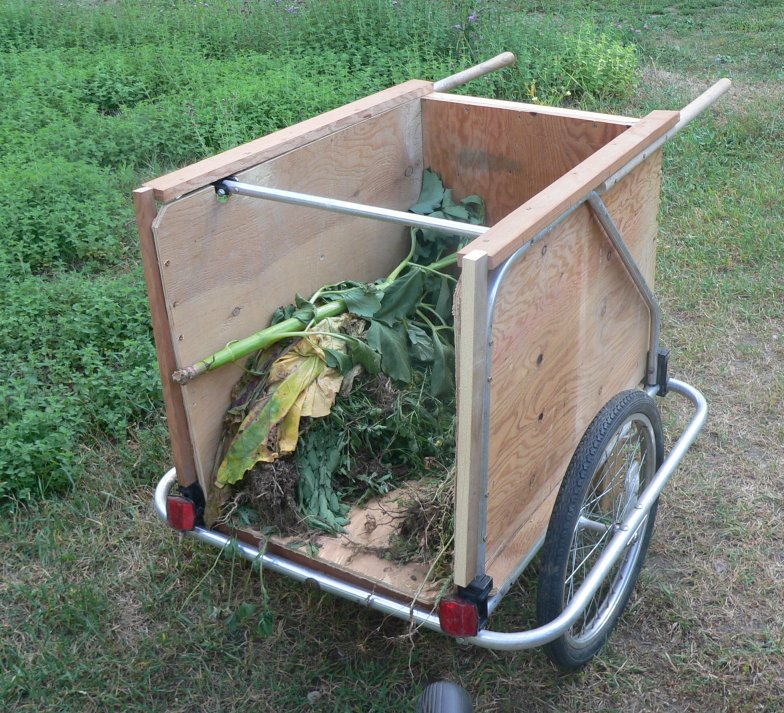
The wood strips are added to protect the edge of the plywood from splintering, and also at the base to secure the base and upright pieces of plywood. The metal bar running across the track may get in the way for some uses, but was on the trailer when I got it, and provides some structural integrity, so I kept it in place.